Please click on the links below for the relevant AGM 2019 documents:
AGM minutes 2018
SWF_Short Croquet League Rules
2020 ASSOCIATION CROQUET LEAGUE RULES (DHW)[38535]
2020 GOLF CROQUET LEAGUE RULES (DHW)[38536]
South West Federation of Croquet Clubs
The SWF covers Gloucestershire, Somerset, Wiltshire, Dorset, Devon, Cornwall, Worcestershire and South Wales
Please click on the links below for the relevant AGM 2019 documents:
AGM minutes 2018
SWF_Short Croquet League Rules
2020 ASSOCIATION CROQUET LEAGUE RULES (DHW)[38535]
2020 GOLF CROQUET LEAGUE RULES (DHW)[38536]
What is the Rush Line?
In figure 1 with Red in the position shown, suppose that Blue wishes to rush Red to 2-back. Then the dotted line a-b is the rush line. The stroke immediately preceding the rush (i.e. a take off or split shot) should, if possible, be played from a point on or near the rush line. For example, if Blue wished to take off to the point x for his rush on Red for 2-back, he will probably get a better rush if he takes off from point a, on the rush line, then if he takes off from point c, situated to one side.
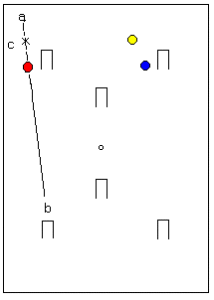
Figure 1 The Rush Line
The reason is of course that the direction of the striker's ball in a take off can be determined much more accurately than the strength. With a take off from point a, a straight rush will automatically be obtained, provided that the stroke is not played much too hard, whereas a high degree of accuracy in strength is needed to get a straight rush with a take off from point c.
Rushing to the Rush Line
At this point Blue may well ask ‘What is the point of telling me that I ought to be on the rush line when I happen to find myself elsewhere?’ The reply is ‘Get a rush to the rush line’. Blue may then demur ‘I have a rush on Yellow to the middle of the North boundary’ (See Figure 1).
This is nowhere near your rush line, and if I try to cut rush, I shall be most unlikely to judge the right strength to land on the rush line. The reply to this is ‘Use the boundaries’. Cut rush Yellow to somewhere near point a. Hit as hard as you can. Yellow may go miles beyond point a, but it will be replaced on the yard line and you will find it near the rush line.
Getting a Rush to the Rush Line
When a rush to the rush line is not ready made, it must be obtained by a previous take-off, or another rush, or by running a hoop, or possibly by all three combined. Look at Figure 2. Blue has just made the Rover and intends to peg Yellow out. In his approach to Rover he has placed Black to the East of the hoop so as to get a rush back to the East of Red as shown in Figure 2.
He plays this rush. He then takes off along Red’s rush line and rushes Red to the boundary near point R, which is situated on the rush line from Yellow to the peg. A take-off along this rush line gives him his rush to the peg. An alternative would be to approach and run Rover so as to rush Black directly to point R. The choice will depend on where you wish to leave the balls after the peg-out.

Figure 2 Using Hoop Point, Rush ond Take-off to get on the Rush Line.
Application to Break Play
The use of the boundaries to get on the rush line may be illustrated by some typical situations arising in a 3-ball or 4-ball break. Look as Figure 3 in which the balls are not shown and only some possible positions of Red are indicated. Blue has just made Hoop 3 off Black and croquets Black to Hoop 5 while going to the pivot ball Yellow. If Red, the pioneer for Hoop 4, is perfectly placed just in front of the hoop, there is no problem - a simple take off to Red is adequate. Let us assume, however, that Red is badly placed. If Red is situated at p, q, or r, then Blue should attempt to get a rush on Yellow off the boundary at p1, q1 or r1 respectively, so that in the following split shot, Blue will in each case travel along the rush line of Red to Hoop 4.
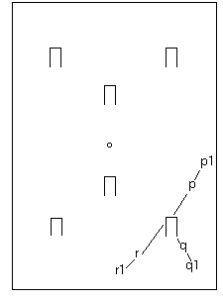
Figure 3 Using the Boundaries
The Straight Stop Shot
There are occasions when the application of the rush line principle is not the best solution to the problem. This is the case when the croqueted ball has to be sent in a direction difficult to achieve from any accessible point on the rush line. For example in Figure 1, if Blue wished to send Yellow to a position in front of Hoop 3 in the stroke which gave him his rush on Red to 2-back, this would be impossible to achieve from point a, but could be done with a straight stop shot from point c.
There is a saying that the mark of a first class player is not how he plays the break, but how he ends it. One way of ending it is to wire the opponent's balls either from each other or from one's own balls. In advanced play the question of wiring is complicated by the lift, and for the present purpose we shall assume that you are a middle bisquer playing a handicap game and in receipt of enough bisques to pick up and play a controlled 4-ball break. Or you may be a high bisquer with even more bisques and the initiative to do likewise.
Now the first rule of successful wiring is indeed to make a break. The reason for this is obvious - a break gives you more strokes to accomplish your wiring scheme. It follows that you should not leave all your wiring till the end of the break, i.e. you should not finish the break and then, as an afterthought, start to think about wiring. The thinking should begin several points before the end of the break. The second rule is, accordingly: Think of your wiring scheme in good time. At the end of a controlled 4-ball break the making of two points will often be sufficient for the wiring scheme and we shall therefore describe the end of the break only. We shall choose a scheme that involves the minimum interference with the normal course of the break, and hence very little increase in the probability of your breaking down. The aim of the scheme is to end up with the opponent's balls DOUBLE wired across the last two hoops that you make, viz 4-back and Penult. This will demonstrate the general principles and when you have grasped these you will be prepared to work out slightly more difficult schemes like cross wiring at a hoop, or even cross pegging.
We take up the narrative at the point where Blue has just run 3-back with a perfect 4-ball break ahead of him, i.e. with the position illustrated in Fig.1. Blue then rushes Yellow short of Black and croquets him to Penult, with a rush on Black to Red. He sends Black to the left and slightly ahead of 4-back and roquets Red into a good position for the hoop. (As in every break, these little easy shots should be made with great care.) In approaching the hoop he places Red a foot or two North East of the hoop and wired from Penult. The position at this stage is illustrated in Fig. 2.

Figure 1

Figure 2
After running 4-back, Blue roquets Red gently, if necessary using the take-off to Black to adjust the position of Red to the perfectly wired position, where he is destined to remain. In the little take-off Blue obtains a rush on Black to just short of Yellow and croquets him to a point south of Penult.
He roquets Yellow and in approaching Penult he sends Yellow past the West side of the hoop to a point wired from 4-back and Red. The positions at this stage are shown in Fig. 3. After running Penult Blue has two more shots with which to adjust the position of Yellow, i.e. the roquet and the take-off to Black. What he must NOT do is to return to Red to adjust its position. Red's position was fixed some time ago, and if it does not lend itself to a double wire, then the wiring must be completed behind one of the hoops only. A second journey to Red can result in failure. The journey is comparatively long, and there is the danger of entanglement with the wires on both the out and return journeys, and it would be more difficult to obtain an accurate rush on Black in the take-off from Red.
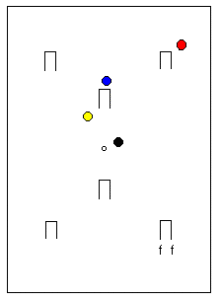
Figure 3
Thus Blue takes off from Yellow to get a good rush on Black to behind Hoop 4. (Since the take-off is at right-angles to the wiring line, Yellow will still remain wired even if it moves appreciably during the take-off.) The final two shots are used to send Blue and Black to the positions indicated by the letters ‘ff’ in Fig.3, in which Black has a ‘dolly’ rush to Hoop 1, and only one ball is open to Red or Yellow.
A shot by Red or Yellow will end up behind Hoop 4 where it can be picked up after making Hoop 4. In playing the second break, Black has only one really difficult shot, i.e. the rush to Hoop 2 after making Hoop 1, but since we assume that he has a bisque or two left, he should have no difficulty in rolling up to Hoop 2, laying a rush and taking a bisque. He then has a ball waiting at Hoop 3 since Yellow was almost certainly the ball that moved.
The whole wiring procedure may at first seem complicated and fraught with danger, but in fact it has deviated little from the normal 4-ball break. There are no difficult shots involved, and there are many opportunities for adjustment if things go wrong. In particular, the attempt at a double wire provides a 'safety net' - if one wiring is not achieved, you still have the chance of the other. Try it out on the court, starting from the position shown in Fig. 1. You will be surprised how quickly you get the idea, especially if you take the bisques to complete the wiring. Practise it. It makes your practice more interesting and improves the accuracy of your break play.
I am delighted to have been asked to contribute some thoughts to SWAN and have been given a wide brief. During the winter months some stalwarts continued to play if their clubs still had a court or two open, but many have hung up their mallets and perhaps just merely reflected upon their successes or otherwise during the past season. Probably otherwise, I suspect, since we tend to recall the stupidities that lost us games we felt we should have won. If we know why we lost, we are at least halfway to not doing the same again. I suppose the reason we lose games is either that we played the wrong tactics or we played some bad shots. Tactics are very difficult to deal with in print - the combinations of ball and peg positions are legion and there are also more difficult factors such as the ability of each player, how many bisques are being given or received, the weather, what we had for breakfast, wouldn't a gin and tonic go down well, etc. etc. Technique is a different thing altogether. It is easier to demonstrate on the court but not impossible to describe in print.
I am addressing this particularly to longer bisquers who are struggling to acquire the ability to play many of the shots that have to be played - and played with confidence. I have always found it surprising that so many people, particularly if they are not so young, after two or three years of playing are still unable to rush a ball from one end of the court to the other. I have done a lot of coaching, in this country, South Africa and the U.S. and the first thing I ask my pupils is whether they can rush a ball from one end to the other. Only a few honest people will say they have a problem. The rest attempt to show me and more often than not don’t get the object ball more than halfway. I then get them to hit a single ball to the other end and it is surprising how many cannot even do that. So we come down to the swing, and I am rude enough to tell them, though I hope very politely, that until they can rush to the other end of the court I am not going to waste my time, or theirs, on anything else.
Beginners usually have a problem getting power into their strokes because they don't SWING. They bring the mallet back to an angle of perhaps 45 degrees and try to force it forward using their wrists. This is bad technique and tiring. You have to get the mallet to do the work, and to do this you must bring the mallet back so it is at least horizontal. Then the weight of the mallet head will do the work for you. There is a bit more to it than that, because you have to get the right movement of the hands going forward, pulling the head after them, not using the wrists to give the forward movement but just pushing the arms forward, which will make the mallet head follow. You can do this with one hand, playing side stance, and even rush a ball like that to the other end. Earlier last year I was coaching in Florida and at one club had about 20 people lined up at the end of the court. As I went along the line I came to a lady wearing a skirt (or dress) down to her ankles, and fairly tight at that. Having established that she didn't want to play side-stance, I said "You’ll either have to roll it up or take it off". She elected to do the former!
Another matter I would suggest you consider is practice. I have always maintained that friendly games are virtually no practice at all. You will inevitably do some bad shots but in a game you can’t play them again, so you don’t find out what you did wrong. I would urge you not to play friendlies but to go on the court on your own and practise. When your split, your roll or rush, doesn’t go right - play it again, and again, and again until you get it right 3 times running. One hour’s practice is worth more than half a dozen friendlies. This of course would make croquet very anti-social if there were 6 to 8 people on the courts (you can easily get two or three people on each court) studiously ignoring each other. But I would urge you to agree with your opponent that you each practise for 30 minutes before you play your game.
An interesting form of practice, even for long bisquers, is to try a two-ball break. Give yourself a rush to the first hoop from the yard-line in front of it. You need to rush the ball to about a yard, or even four feet short of the hoop, and slightly to the side, that is, not dead in front. The reason for this is that you must approach with a stopshot so as to send the croqueted ball 4 or 5 yards past the hoop, and it needs to be directly on the line of the 1st and 2nd hoops, which you can’t do if you are dead in front to start with. Now you must run the hoop to get a rush to the second. If you run past the other ball just give up and start again, because the odds on getting position for the 2nd from so far are very long. If you get a reasonable rush (something remotely in the right direction) rush it down and approach the 2nd hoop. I would guess that anyone with a handicap in double figures will need many attempts to make the second hoop but it will give you good practice at rushing, cut-rushing, and approaching from every different angle and distance. And remember when approaching the 2nd to get the croqueted ball on the right side of the hoop so that you might get a rush to the third. It’s difficult to but it’s a challenge and different and it certainly won’t do you any harm. And each time you get as far as the 3rd or the 4th or whatever it will be a challenge for you next time to get further.
You won’t need me to tell you that we have had the wettest winter since records began, and those of you who know anything of the ways of nature will be looking apprehensively at the lawns to see what havoc has been wrought in the close season. With the mild November and December, leaves were still on the trees on Boxing Day, and I can only hope that those of you who enjoy winter play used the besom to good effect! So let’s hope that you have no soggy rotting leaves to contend with, in addition to the moss, which I’ll wager is there in profusion.
It’s almost inevitable that you’ll have cushion moss, the tiny upright stems packed closely together, which thrive on closely mown lawns. The golden feathery stems of the trailing mosses will be around the root system of any trees adjacent to courts. And then there is the possibility of the upright mosses. All will have thrived on the continually damp conditions of this winter, as waterlogged patches, probably around the hoops, almost always develop moss.
But too much moisture is not the only high risk factor, as moss thrives equally well on infertile but well drained soil. Skimping with the summer and autumn feeds last season, as well as over acidity, combined with compaction will all have added to the reasons for an abundance of this unwelcome plant amongst your fine fescues. So what are we to do about it?
There are two recognised courses of action. Lawn sand will burn out moss and at the same time provide a boost to grass growth. It must be applied strictly in accordance with your supplier’s instructions, as the active ingredient, ferrous sulphate, can scorch the grass if carelessly used. It only kills the top growth, leaving the root system intact. But lawn sand will keep in check a wide variety of your lawn weeds as well as the moss. Additionally its other ingredient, ammonium sulphate, will give the lawn a good healthy vibrant look, as any brown patches will he greened up.
Use on a sunny morning, when the grass is still moist from dew, and when there is prospect of fine weather for 36 to 48 hours. You mustn’t mow or walk on the lawn until it rains, as, perish the thought, you will need to get out the hose, as the product does need watering in. Once the moss dies off, it’s time for the scarifier to gouge out any thatch and the dead debris.
Easier to use, but considerably more expensive, is to water on a dichlorophen product. As with the lawn sand, the lawn will need scarifying in two weeks after application. But is there anything we can do to prevent moss in the first place - for remember, moss is a symptom of neglected or misused turf! Well, firstly, improve the drainage. This means hollow tyning in September, before top dressing followed by overseeding. Secondly, remember that your fine grasses have equal needs to any other living organism - consequently, a correctly balanced diet of nitrogen, phosphates and potash is vital, spring, summer and autumn. Next, reduce shade, by pruning branches from trees, but better still, remember, trees in the immediate proximity of your lawn spell out what the law refers to as "an indifferent lawn". And finally, cut the grass at the correct height.... and if I follow this last requirement, you will only grumble that the lawn hasn't been cut!! The truth of the matter is that this near shaving of lawns only weakens fine grasses, which then have difficulty in competing with the moss plants in the early spring. So, if you cannot close a lawn in September, and carry out the above work, and insist on closely cropped grass, then face the inescapable task of attempting to eradicate moss each April. Ah well, it keeps me in a job!
1 The Banana and Wafer Cannons – SWAN 14 (1995)
Introduction
The title is intended to signify ‘beginners in the use of cannons’, and it is thus of interest to novices, many experienced high bisquers, and, I suspect, not a few middle bisquers. In his book entitled ‘Modern Croquet Tactics’ (first published in 1905) C.D.Locock devotes a whole chapter of twenty pages to the subject of cannons, including no less than sixteen 3-ball corner cannons. In my experience it is not necessary to learn more than four or five cannons to cover most situations, particularly as many opportunities for the use of a cannon arise elsewhere than in a corner. This is not to say that Locock was exaggerating the value of cannons. Most certainly not.
Many players experienced in other departments of the game but not familiar with cannons are somewhat embarrassed or confused when they find themselves with three balls in contact on the yard line. But the enthusiastic exponent of the cannon knows that a 3-ball cannon means at the least a good rush to his hoop, and often a good chance of a 3-ball break, and that a 4-ball cannon means an automatic 4-ball break. The reason is embodied in Law 19(b) dealing with groups of three or four balls in mutual contact (at least one of which must be a yard line ball). In this situation all the balls except the roqueted ball become balls in hand and, with a 3-ball group, may be placed in any position in contact with the roqueted ball (but not in contact with one another).
The Banana Cannon
There is one cannon that most players learn to use early in their croquet career. This is the so-called banana cannon, illustrated in Figure 1. Certainly there are occasions when this is the cannon to use, as we shall see, but more often than not it is better to employ the wafer cannon. Before going on to deal with the latter, it will be as well to say a few words about the placing of the balls for the banana cannon.
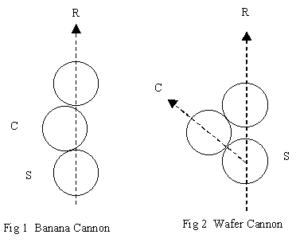
In Figure 1 the ball marked S is the striker’s ball, C is the ball from which he is taking croquet and the third ball is placed in contact with the croqueted ball so that the edge of the croqueted ball projects over the line joining the centres of the other two balls (the dashed line in the figure). The object of the stroke is to get a rush on the third ball and this is achieved by aiming straight at the third ball and giving a gentle tap. The centre ball should fall to one side, leaving a rush along the line R with the balls not more than a foot apart. The important thing is the projection of the edge of ball C over the line of R. If it does not project then on tricky ground, e.g. near a corner spot, one of the balls may roll back or sideways and spoil the rush. Even with this precaution the balls may sometimes roll off line on bad ground, and this is one (but by no means the only) reason for using the wafer cannon.
The Wafer Cannon
This is illustrated in Figure 2. The third ball is still placed on the rush line R, but now it is almost touching the striker’s ball, the gap between the two being wafer thin, say one sixteenth of an inch.
This gap can be varied to suit circumstances as you get more experienced, but if a rush is all that is required then the gap should be kept as small as possible without the balls touching. They must both be in contact with the croqueted ball C, and some care is required in placing the balls, especially on rough ground. Now comes the execution of the stroke. Aim along the rush line R and treat it as a normal rush, but with extra power because the croqueted ball C will also be moved some yards and this takes some of the sting out of the rush. There are several advantages over the banana cannon. Firstly the whole thing is done in one shot, so there is no question of balls rolling back and spoiling the rush. Secondly the croqueted ball can be made to move a considerable distance: it can often be moved to a particularly advantageous position, but at the very least the wafer cannon gives an easy rush to the hoop and gets the croqueted ball into court.
What are the disadvantages? The main problem is to ensure that the croqueted ball does not go off the boundary. Look at Figure 3. In the right hand part of the figure a wafer cannon is used to rush a ball to Hoop 3 and in the same shot to move the croqueted ball towards Hoop 4, thus getting a 3-ball break.
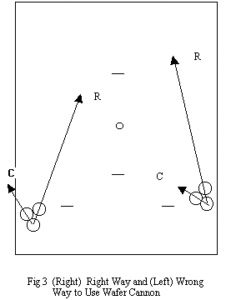
In the left hand part of Figure 3 an attempt is made to use a wafer cannon to rush a ball to Hoop 6. Inevitably the croqueted ball will be driven over the boundary, and the turn will end. When the balls are in or near a corner like this it will be found impossible to get a rush diagonally out into court without the croqueted ball going off. To get the rush in this situation the banana cannon (or no cannon at all) has to be used. Remember, in the wafer cannon the croqueted ball must not go over the boundary, but either of the other balls can because they have been involved in a rush, albeit in a rush performed in the same stroke as a croquet stroke.
Conclusion
You do not have to wait for a cannon to appear. You will find many opportunities for deliberately creating one. For example, when you take off to your opponent’s balls joined up on the boundary within a foot or so of one another, if your take-off is a good one, and you land within a couple of feet of the balls, try to cut it behind the other ball so that it comes back on the yard line in contact, and you have your cannon.
As in all other aspects of the game, practice makes perfect, so if you have never played a wafer cannon before, try it out repeatedly in practice before using it in a game.
2 Six Cannons for the Price of One – SWAN 15 (1996)
The wafer cannon dealt with in a previous article is the most important because it can be used anywhere on the yardline and is the easiest to learn. The cannon dealt with in this article is the second easiest to learn. With minor modification it can be employed in six common situations so that the opportunities for its application are sufficiently frequent to make the time involved in perfecting it worth while. Let’s start in Corner 1 where you have three balls in contact and you are for Hoop 1. The object of the stroke is to croquet one ball to Hoop 2 and in the same stroke rush the other to Hoop 1, thus getting a 3-ball break.
First Corner Cannon (for Hoop 1)
The striker’s ball (marked S in Figure 1) is placed in contact with the croqueted ball (marked C) so that the line joining the centres of S and C points slightly to the left (about 1-2 yards) of Hoop 2. The ball to be rushed (marked R) is then placed in contact with ball C in such a way that the line joining the centres of R and C is at right angles to the line joining the centres of C AND S. The point of aim will depend on exactly how you intend to play the stroke, and it is here that you need to go on a court and experiment until you find the method that suits you best. For guidance the point of aim will lie somewhere between Hoop 1 and Hoop 6. With a full stop shot hard enough to send the croqueted ball to Hoop 2, you should try aiming at Hoop1. If you find the rushed ball goes too far beyond Hoop 1, try aiming at the peg, or if necessary at Hoop 6. You will probably find, as I do, that with a stop shot you need to aim at or near Hoop1, but with a drive you need to aim near Hoop 6. Having decided which is the best method for YOU, practise it until you can produce a good 3-ball break situation every time. Of course the strength required to get the croqueted ball to Hoop 2 will vary with the speed of the lawn, but if you can get this ball right, the other ball will be right, or nearly so.
Obviously the identical cannon can be used when the balls are in Corner 3 and you are for Hoop 3, and further, by simply changing the ball arrangement from right-handed to left-handed, the same cannon can be used to make 1-back from Corner 2 or 3-back from Corner 4.
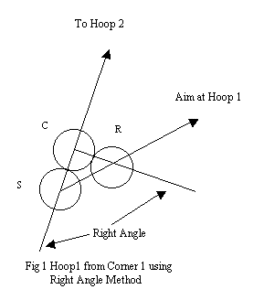
Second Corner Cannon (for Hoop 2)
By slight modification the same cannon can be made to give a reasonable chance of a break from Corner 2 when you are for Hoop 2, or from Corner 1 when you are for 2-back. Look at Figure 2. This shows the right –angle cannon already described, placed to make Hoop 1 from Corner 1, and the same cannon with the balls in Corner 2.The ball placement is identical for both cannons. The line marked C represents the direction in which the croqueted ball is pointed (1-2 yards to the side of the next hoop but one), and the line marked A is the recommended direction of aim (directly at Hoop 2 for the cannon from Corner 2). The only difference between the two cannons is that from Corner 1 the stroke is a stop shot (or possibly drive), while from Corner 2 it is a part roll. Again you must go on to the court and experiment to find the best stroke for YOU. You should now aim always at Hoop 2 and adjust the amount of roll and the strength of the shot to send the croqueted ball to Hoop 3, and rush the other ball to Hoop 2.
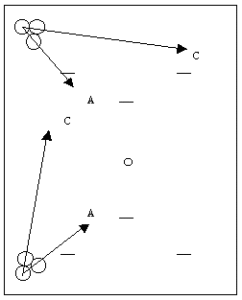
Figure 2 - (Bottom) Hoop 1 from Corner 1: (Top) Hoop 2 from Corner 2
Conclusion
Remember, for both variations of the cannon you should experiment with the amount of roll or stop and the direction of aim as described. It is experimenting with shots that can make practice more interesting.
You do not have to wait until a cannon appears. You can often deliberately create one, either by rushing a ball into a corner that already contains a corner ball, or by taking off to a pair of balls in a corner and roqueting one of them carefully so that they both end up in the corner.
3 The Halfpenny Cannon – SWAN 16 (1997)
Hoop 4 from Corner 4 (and 4-back from Corner 3)
Of the cannons to make each of the eight corner hoops from their respective corners, six were described in Part 2 of this series (SWAN April 1996, page 18). The remaining two corner hoops, viz. Hoop 4 from Corner 4, and 4-back from Corner 3, may both be made by the cannon described here, viz., the ‘Halfpenny Cannon’. In the six corner cannons previously described, the croqueted ball was sent to the next-hoop-but-one and the rushed ball was sent to the next hoop. In the ‘Halfpenny Cannon’ the reverse is the case.
The Halfpenny Cannon
The placement of the balls to make Hoop 4 from Corner 4 is shown in Figure 1, in which the striker’s ball is marked S, the croqueted ball C and the rushed ball R. The balls are shown greatly enlarged relative to the size of the hoop and the dimensions of the corner of the court, in order to indicate the details of the placement. The balls S and R are adjusted as though to rush R to a point about 1-2 yards to the right of Hoop 4, with the gap between S and R equal to 10mm (3/8 inch), i.e. equal to one half of the diameter of a new penny. The size of the gap is important, and a penny should be used in practice to get this right. (In a game the gap must be estimated by ocular test alone, as the laws do not allow the use of measuring aids.) If the gap has been adjusted correctly, it will be found that the line between the centres of the balls S and C will point slightly into court, say at a point about 3 yards up the west boundary.
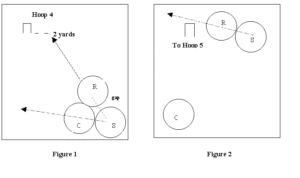
The shot is played directly at ball R with a drive (flat mallet), hard enough to send ball R to just beyond and to the right of Hoop 4. The croqueted ball C will then end up near the yard line behind Hoop 4. The striker’s ball S is now in hand and takes croquet from ball R (See Figure 2) with a little stop shot that sends ball R to Hoop 5 and itself takes position in front of Hoop 4. The striker then runs the hoop firmly to ball C and has a 3-ball break.
The difficult shot for the beginner is the stop shot hoop approach. It is difficult only because it is not normally practised. Thus if you want to use this cannon in earnest, you must practise not only the cannon itself, but the stop shot approach from various positions to the right of Hoop 4.
The application of the ‘Halfpenny Cannon’ to make 4-back from Corner 3 needs little further explanation. The rushed ball is now directed 1-2 yards to the LEFT of 4-back and. With gap adjusted, the croqueted ball will point a little way down from Corner 2. After playing the cannon shot, 4-back is approached with a little stop shot sending ball R to penult, and the hoop is run firmly to ball C.
As with all shots, practice makes perfect, and this applies particularly to the two cannons described in this article. It can be fun practising them, and you may find that the ‘Halfpenny Cannon’ is not as difficult as you first thought.
Four Ball Cannons – SWAN 17 (1998)
Although 4-ball cannons seem at first sight to be rather complicated, it is easier to get a 4-ball break from a 4-ball cannon than from a 3-ball.
4-ball cannons are not as difficult to set up and execute once you have grasped their principle. I shall illustrate two and leave you to work out the others. However, the warning that attempts to get a 4-ball break from a corner situated diagonally opposite to the hoop required (e.g. Hoop 3 from Corner 1), whilst although theoretically possible, are likely to result in a broken mallet.
Hoop 1 from Corner 1 (Figure 1)
The principle is illustrated in Figure 1, in which the striker’s ball is marked S, the croqueted ball is marked C, the ball to be rushed is marked R and the ball to be promoted is marked P.
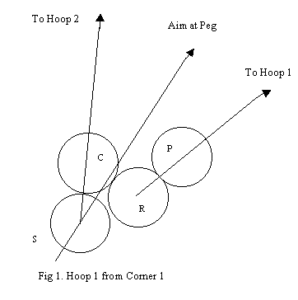
First set up the wafer cannon with C pointed slightly to the left of Hoop 2 and R in contact with C and almost touching the striker’s ball S. Now place the ball to be promoted, P, in contact with R so that the line R-P points directly at Hoop 1. The point of aim differs from that in a normal wafer cannon. Instead of aiming directly at the ball to be rushed, the aim is now directed nearer the croqueted ball because this ball has to travel the greatest distance. Aiming at the peg will be about right. The shot must be more powerful than is needed for a simple croquet shot because all four balls have to be moved. If the shot is hard enough to send C to Hoop 2 it will be found that P goes near to Hoop 1 (it has not yet been roqueted) and the rushed ball goes near to the south boundary where it can be croqueted into the court while going to the ball at Hoop 1.
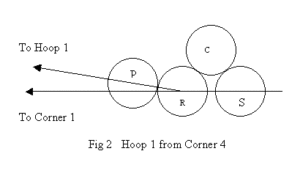
Hoop 1 from Corner 4 (Figure 2)
First set up the wafer cannon with a rush along the south boundary. Then place P in contact with the ball to be rushed, R, so that the line R-P points to Hoop 1. Now play the shot as though you were rushing ball R along the south boundary, but hard enough to send ball P to Hoop 1. R will be driven off the south boundary close to Corner 4. This leaves a simple croquet shot to send the ball R to Hoop 2 and going to P at Hoop 1. The originally croqueted ball C will end up somewhere beyond Hoop 4.
Creating 4-ball Cannons
One way of getting a 4-ball cannon is to rush your partner ball into a corner that is already occupied by both enemy balls. A 4-ball cannon may also arise at the start of the game when both players shoot both balls into Corner 4.
5 3-Ball Promotion Cannon (written for 1999 SWAN)
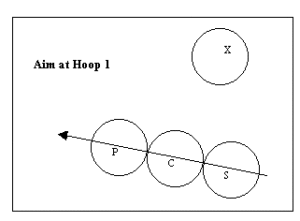
The promotion of a ball in a 4-ball cannon was described in the 4th article. However, the situation with four balls close together on the boundary is more likely to give rise to, or allow you to create, a 3-ball promotion cannon. The arrangement of this is shown in the figure, in which S is the striker’s ball, C the croqueted ball, P the ball to be promoted, and X the fourth ball nearby.
Suppose, at the start of a handicap game, that your low bisque opponent, playing second, has shot at you with both balls and has missed with both shots, so that on the fifth turn of the game you step on to the court with all four balls lined up close together on the east boundary near corner 4. You then contrive to roquet one of the balls gently behind another so as to obtain a 3-ball cannon. You then arrange the balls in an approximate line with C – P pointing to Hoop 1.
If you now play a full stop shot, the promoted ball, P, will be driven to Hoop 1 WITHOUT BEING ROQUETED, and your ball, S, will stop a few yards from the boundary. You now turn round and shoot at the remaining ball, X. You are then left with the split roll, sending ball X to hoop 2 and going to ball P, which is waiting at Hoop 1. The original croqueted ball, C, ends up somewhere near hoop 4.
Certainly the manœuvre is more difficult than the cannons I have described previously, firstly because you have to do a stop shot good enough to send ball P to Hoop1 while remaining within hitting distance of the ball X on the boundary (of course if you have bisques there is no danger), and secondly because you have to do the big split roll to hoops 1 and 2. It is well worth practising, even by relatively high bisquers, because after all it is better to live dangerously and have an exciting game.
Incidently, if you win the toss and put your low bisque opponent in first, and he goes in corner 4 with his first ball, you join him a yard wide with your first ball, tempting him to shoot at you with his second. If he misses, you join the three balls with your fourth ball, take a bisque and carry out the promotion cannon as described above.
Playing croquet is like waiting for a bus; you wait eleven years for a trophy and then several come at once! This time last year I wrote an article for SWAN recalling ten years in the B-League and my seeming inability to get off a 20 handicap. Well I won’t be playing B-League this season, having finally got my handicap down and picked up some long overdue silverware on the way. I shall be in the Intermediate League as of right (as opposed to being sent in to bat off 18 by a desperate team manager!) and may even play in some Federation matches. So if I can do it, so can YOU!
“Oh look out, here comes the professional 20,” cried Hamish Hall last season as I arrived with the Longman Cup team at Bristol and we beat them 5-0. Yet on two occasions I had been prevented from going down to 18 by being trounced by Bristol players in the B-League!! Club handicappers have a problem when dealing with perennial B-League players. Many of them are not CA members, rarely play on full size lawns and only play a handful of competitive games each season. Most of them also play croquet of which Aunt Emma would be proud. At Dyffryn Chris Williams has always insisted that even non CA members keep a handicap card, and all B-League games are included, as otherwise high handicap players would never come down. Unfortunately, however, a lot of high bisquers get trapped by constantly playing each other and swapping the 10 points back and forth like yo-yos.
Every season for the past 11 years I have also entered our Dyffryn Cup and All England qualifier, and have occasionally had some good wins in the early rounds by dint of using my bisques well against low handicapped players, but more often the bisques would run out and I would lose by a narrow margin. Also my inability to hit roquets was my undoing. During breaks I would squander bisques see-sawing round the pivot, and when I came across Aunt Emma I could never get the innings back.
So what changed? When I started at Dyffryn my son was four and I had to get a babysitter to play a match, so I never joined the CA. I was not particularly competitive and played croquet for enjoyment, so I didn’t think I was a tournament animal. When James started to play I enrolled him as a junior CA member and drove him to Nailsea and Cheltenham to play in weekend handicap tournaments. I found myself sitting around all day getting nervous on his behalf, and realised that I had played a good number of the competitors in past B-League seasons, so why wasn’t I playing myself? At least then James couldn’t complain that I was putting him off! So I joined the CA. Good move!
Last season we braved the Easter blizzards at Cheltenham and went down to Southwick for the Spring Bank Holiday. I played 14 games in these tournaments as a 20 and won 7, lost 7, so my handicap was right, but instead of coming in cold to our club competitions in May these tournaments allowed me to play myself in, with the result that I reached the final of both handicap competitions at Dyffryn, and qualified for the All England Area Finals. I also won our short croquet competition and then went on to win the National Short Croquet Finals at Solihull.
My dramatic improvement is due to a number of factors. I had 40 games on my card last season, as opposed to 10 or less in previous seasons. I also addressed the problem of my inability to hit roquets; I had never been able to hold the mallet with both hands on top and develop a wristy swing, but Bo Harris at Cheltenham put me on the right track by suggesting that I bring the top hand down rather than the bottom hand up, and that I do it an inch at a time until I felt comfortable. I had improved my hoop running by hitting the ball gently and ‘stroking’ it through, and I discovered that standing forward over the ball and using the same technique for short roquets was very effective.
James meanwhile continued to improve too, and I took him to a silver gilt coaching course given by Colin Irwin as well as to several Junior Squad coaching sessions given by Chris Clarke. There is definitely something to be said for watching the best players, and I learned a lot from being a spectator. On the full size lawns at Dyffryn, which are notoriously slow, most of my breaks broke down because I couldn’t hit the cross-court shots hard enough and then missed the pivot. I have finally twigged that it is not written in tablets of stone that the pivot ball should always be in the centre of the lawn, and that I don’t NEED to do long split shots if I can perfect my rushes and stop shots.
Most importantly I have stopped selling myself short, and now believe that I am good enough to get my handicap into single figures. I think I used to convince myself I was going to miss before I even went on to the lawn. I only actually played in three handicap tournaments last season, two of which I could reach daily from home. The atmosphere is good and you will have fun even if you don’t win. There are handicap weekends in the CA fixture book covering the whole South West region, and even if you don’t want to join the CA there are high bisquer tournaments open to all comers, some of which are advertised in this newsletter. My advice to all high handicap players is to go forth and play. NEVER refuse to take part in a competition because you think you are not good enough. You might be soundly beaten, but in my experience the better players are only too willing to give you help and encouragement, and you will never get better if you keep playing the same people again and again in friendly games. Part of the reason I spent 10 years in the B-League was that our team manager had the greatest difficulty in persuading our beginners to take part. Remember that B stands for beginner. If you are a beginner, you should be taking part. If you’ve been at it for 10 years, it’s time you joined the CA, started playing in small tournaments and using your bisques to build breaks.
“Bob’s looking around the lawn, wondering what cunning strategy to use with the first ball. It looks like he’s heading towards the end of A-baulk now; yes, it’s down … he’s playing a few yards up the east boundary. I think it’s the psychological approach, trying to bore his opponent out of playing well. It may be working … I may have detected a slight yawn from Mary as he played it. One of the two spectators is already lost to a newspaper.
Now, what will her response be? Oh, my word, a standard tice … it looks about level with hoop 5 off the west boundary, trying to give him some of his own medicine. Completely psychological these two; each trying to out-bore the other.”
Who, we must ask, will fall asleep first?
The opening we all know so well; the first ball tucked well out of the game, and the second ball put (sensibly) at 50-50 hitting range, but always on the same boundary.
Here are a few suggestions for the coming season. Even if they look a little unnerving for a match, they could at least be tried in friendlies to give something worth talking about after the game!
Playing First
1. Lay a long tice. If your opponent then goes to the east boundary, join up with it!
2. Playing against lots of bisques, trickle a ball out near hoop 1 (and watch your opponent squirm).
3. Roll a ball out to the middle of the lawn, ‘threatening’ to shoot at their ball wherever they put it.
Playing Second (assuming a standard first ball)
1. Lay a tice 3 – 4 yards east of corner II; if they miss it on the left, they will probably give you a double.
2. Against lots of bisques, join with their first ball. A collection of balls should not confuse you, but it may confuse them!
3. (Amusement value only) With lots of bisques, deem in corner III. What can they do?
It is surprisingly difficult to do much wrong with the first ball on the lawn. Think of a few positions and ask yourself whether you would really give anything away by trying it.
When long-bisquers say to me "what's your handicap?" and I reply "minus one and a half" they often assume that they are not worthy to discuss croquet with me. I think that's a shame, and would like to thank the people who have helped me achieve my success and perhaps in my turn inspire some to work towards greater things. For many this could be as simple as taking part in a CA tournament. It is by those of us already involved in the game being inspirational and encouraging that others will follow, stay a while and go some way to achieving their potential. Recruitment and retention is the key to survival.
Having first lifted a mallet in July 1991 for fun to show an American colleague something typically English in Cirencester, I was pounced upon by compulsive enthusiast Trevor Howard. He engendered a sense of excitement and shaped my thinking about the game right from the start with intelligent comment about tactics and a rigorous approach to practice. I played in the B league for Cirencester for the remainder of the season.
In May the following year I was off to Budleigh for a weekend of coaching run by David Purdon. David still loves to hear that he taught me everything I know about the game, and, to a greater extent than David admits to himself, that is true. The basic skills of thinking about how to set up and run a break, plan and execute a leave, and analyse the openings and responses, are absolutely the most important aspects of the game. David is one of many coaches in the area who give their time and experience tirelessly and patiently to help others improve their game: well done. Whilst on the subject of coaching I must confess to purchasing my third copy of “Plus One On Time” by Don Gaunt at Christmas. Don is often with me when I have an angled hoop to run: I remember one of his diagrams showing the enormous margin for error if you think about the two extremes and aim between. I also think about Bo Harris at Cheltenham - stroke the ball like threading a needle.
I soon played a weekend tournament at Nailsea and, despite the non-stop rain, discovered the real thrill of the game: tournament play. I played the manager and was assigned an official handicap of 16. Then I was away to Budleigh for the August week. As a new and enthusiastic player the sight of the vast acreage laid for croquet with scores of white clad players was thrilling. I immediately decided that I would retire to Budleigh (I bet that’s got a few people worried).
Of the 30 or so games I played that year I won the majority easily because I had many more bisques than were necessary. I remember my first game against John Toye (a scratch player then) who took the ‘26 with bisques standing’ result in his stride. Instead of calling me a bandit, as many later did, he said that I was going to see my handicap tumble rapidly and should ignore the unkind comments of others to come. I fell back on that many times over the following few years. Despite requests from me and others my handicap was never ‘chopped’. I think the handicap system does not cope adequately with rapid improvers: they (me at one time) do spoil it for others. During that tournament at Budleigh I remember I had a rover peel to do with 5 bisques left and I still failed to peg out! That evening Trevor spent some time explaining how to do a rover peel: “you put red here, blue there, etc.”. The following day I had a similar turn but with fewer bisques to “just get round and peel rover.” I remembered Trevor’s commentary and placed the red exactly in the right place, ran the hoop, lined up the peel and noticed I was playing blue and black! Back to the tactics board I think.
I’m not sure if I really want to thank David Harrison-Wood for supporting my belief that it is perfectly normal to devote every leisure hour (and more) to the game. Those long warm evenings at Budleigh playing one game after another until it was too dark to see the hoops, never mind the balls, were very enjoyable.
By the end of the following year I was bored with handicap tournament play since the number of bisques I had almost invariably meant there was no real contest. I became interested in peeling turns and started to lose games because I was more interested in meeting my own challenge than simply winning the game. This stayed with me until quite recently when Don Gaunt pointed out that, if I were to achieve my next ambition, winning matters more than being clever.
1994 was devoted to the triple peel. It was Dab Wheeler who saw me practising one evening at Cheltenham and showed me the mechanics of a standard triple peel – little did she know then what she was unleashing on the croquet world! I’ve subsequently found a large number of ways of failing to complete one and earned myself a deserved reputation for recklessness. Success finally came in the penultimate game of the season on Cheltenham's Lawn 8 at teatime (I have always been a show off). In a handicap game, I was giving bisques and my opponent had stopped at 4-back. Someone must have suggested this to him as his best chance: “get a clip on 4-back, let him make a mess of trying a triple peel”. The tactic failed and I did my first TPO to gain my most treasured prize: a CA gold merit award.
I learnt a lot in my early years from low handicap players at handicap tournaments but there are fewer and fewer of them in attendance now. From my own perspective, it’s not much fun turning up for a weekend’s play when all that happens is one sits down and pulls out bisques, then takes a long shot with a less than 50% chance of hitting it. There is generally such pressure on lawns that each player gets the same number of games, not the same time on the court.
Through Croquet I have visited Ireland and Switzerland in English representative teams and enjoyed myself enormously, making many friends along the way. In my experience the vast majority of players, including those of scratch and below, are delighted to give a little time to help improve one’s game. Don’t be bashful, ask for some specific advice or help with a particular shot. Whatever you think you most need help with and I’m sure you’ll get the help you require. In conclusion, a big THANK YOU to all those who have helped me along the way and I hope you will all continue to give your help; it is appreciated greatly.
The Club
I’d had two months of hearing about ‘The Croquet Club’ my dad had joined. We could play Croquet at home on our back lawn. But no. Dad had joined a club half an hour’s drive away. To choose an hour’s drive over walking outside to the garden was either sheer madness or a sudden rush of senility; I wasn’t sure which.
On the way to the sea, Dad had realised that he wanted to check on something at ‘The Club’. Oh joy; I’d even have to see it. As we rolled into the driveway, I cursed myself for a twinge of curiosity. I knew what Croquet was all about; hoops, balls, mallets and plenty of luck. There was just enough skill involved that my brother would usually beat me if we played in the summer.
Down the drive and ... what's that? One, two, three; six hoops, and a peg in the middle. But it couldn't be one lawn; it was too big. I turned my head to see it all. It was SO flat! The grass was SO short! Here was something that I had to have a go at.
As Dad reversed the car to park, my eyes widened. This lawn was one of several. “Blimey”. We walked to the club-house. There were players on a couple of the lawns. The balls seemed to roll endlessly before coming to a gentle stop. Surely I would be able to have a go without becoming a member. But not that day, it turned out. Dad wanted to get to the sea.
The Expert
I could have had six free lessons before joining, but only needed two to be persuaded. The other members were old. I didn’t mind; they were all very nice and kept telling me how well I was doing. I didn’t need to be told though; everything was measured against Dad’s ability and after three trips to the club, I had caught him up. Not a great deal left to learn, I felt; but it was good fun.
A fifty year old sauntered over and introduced himself as William. I'd heard of ‘William’; apparently an expert. He offered to give me a few tips. This should be interesting, I thought. “Now, could you hit this ball with that, could you?”, he asked politely. A trivial test; I did as I was bid. “Ah, well done,” he congratulated warmly. “Could you do that again, could you?” Perhaps this would not be so helpful. I nearly missed it the second time, but was still congratulated. “Now, what about when we've two balls together, like this?” he asked. It looked easier than it turned out to be. “Very good, very good.”
I was becoming impatient to see the expert play. He didn’t even have his mallet with him. “Now, what about a bigger shot? Could you send that ball to that hoop and this ball to that hoop?” he pointed. Now that really was a big shot. I wondered briefly if it was a trick; he must know it would be nearly impossible to send both balls 20 yards in different directions. I set them up and slugged the balls. Not bad, I thought, only a few yards out with each ball. “Very well done,” he congratulated. He explained something about angles, which meant that I would be able to play it better next time. “Would you like to try that again, would you?”
My patience had run out; it was like asking for miracles to improve on my last shot. “I’d like to see you play.” He looked thoroughly abashed, not at all eager to display these hidden talents that others talked about. Suspicions up, I stood my ground nervously as he assessed me thoughtfully. “You’d like to see me play that shot; would you?” I could see in his eyes that he would prefer not to. “Yes, please.” This would test him. If he did any better than my effort, I would listen to him. If not, it was all bluff.
He took my mallet and weighed it in his hands before knocking two balls to the starting position. It looked like a very awkward style, with the mallet off-vertical. There was no way that he would be able to play accurately like that. After a final few words about the angle that he was pointing the mallet, William took his shot. ‘Good direction’, I thought; the balls seemed to be on rails. Slower and slower they rolled as my head scanned back and forth between the two balls and their intended destinations. They stopped. So did I. Each ball was inch perfect.